Audio and transcripts
Applies to WhisprDesk 1.9.0 · Updated 2026-11-16
WhisprDesk saves the text of your dictations on the Transcripts tab so you can copy them again, and you can turn that off. Recordings are not saved by default. If you turn on Audio Retention, recordings are kept only on your Mac for the window you choose and then deleted automatically.
Before you start
Open the WhisprDesk app: click its icon in the Dock, or open it from your Applications folder. The WhisprDesk window opens on the Transcripts tab. If WhisprDesk is running but you don't see its window, click the WhisprDesk icon in the menu bar at the top right of your screen and choose Open WhisprDesk. Across the top are the Transcripts, Notes, Transcribe a file, Vocabulary, and Models tabs, and the gear button at the top right opens Settings.
Your Transcripts
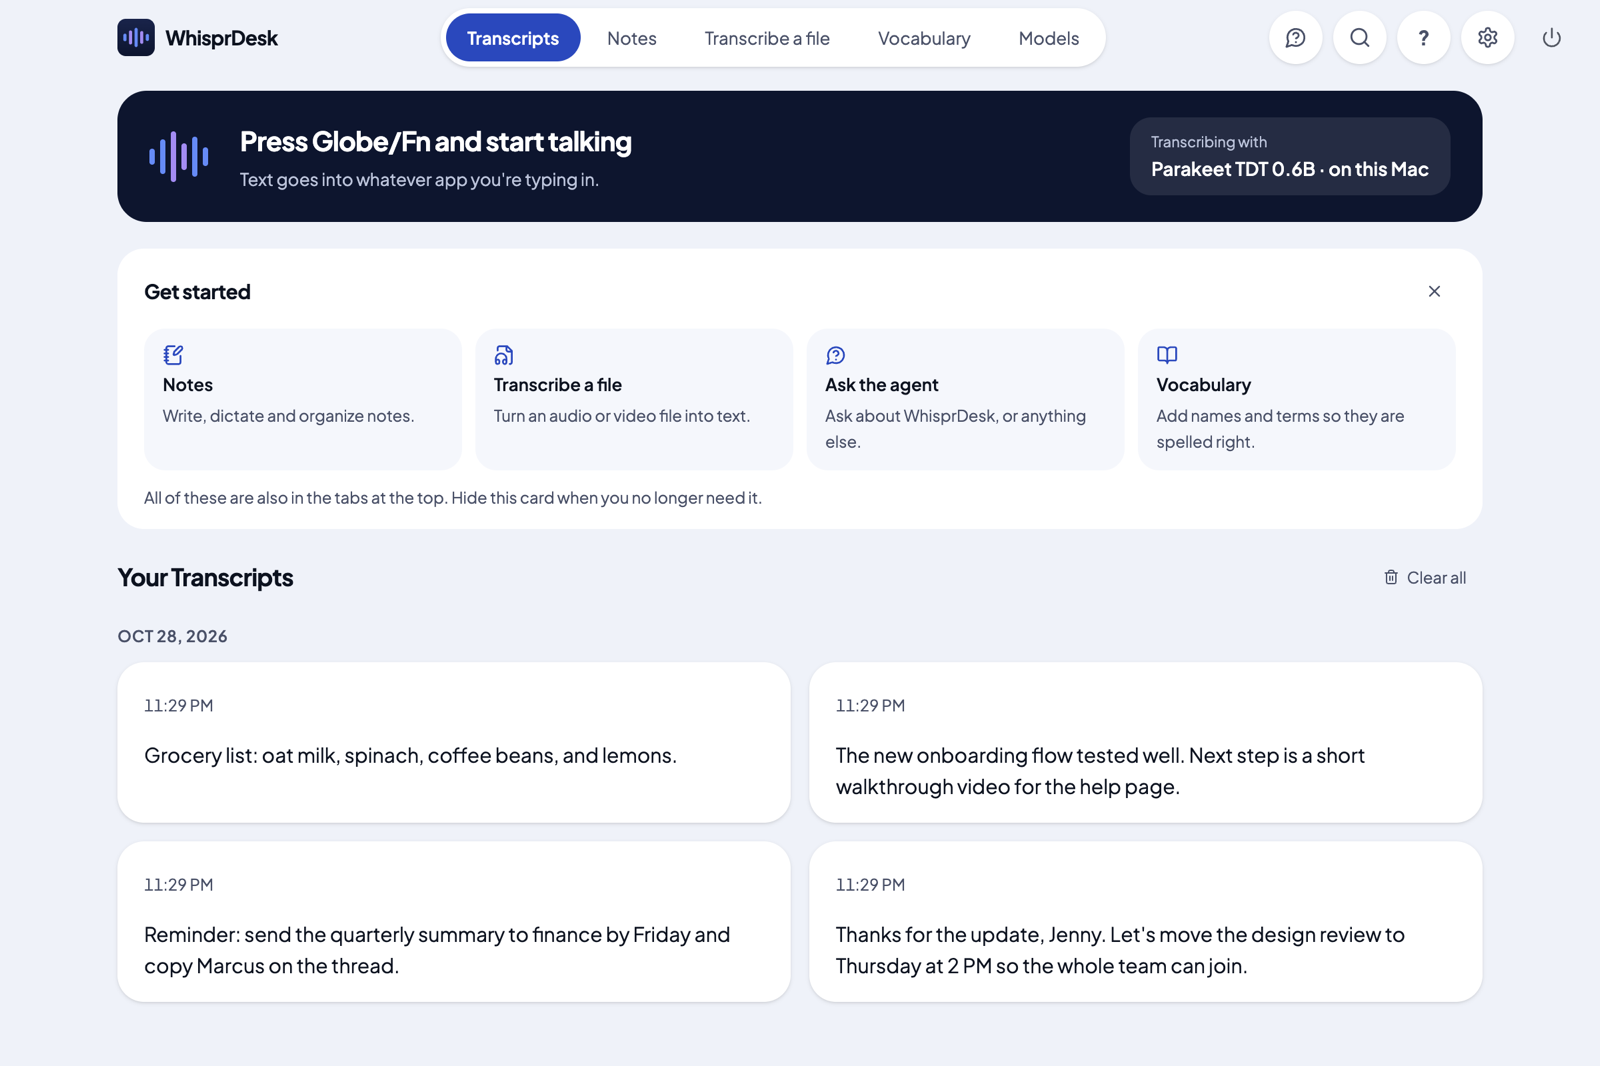
Where: WhisprDesk > Transcripts tab
Open the WhisprDesk app: click its icon in the Dock (or open it from your Applications folder).
Click the Transcripts tab at the top of the window. Your dictations are listed under Your Transcripts, newest first. If you have none yet, you will see No transcripts yet.
Hover over an item to show its buttons:
- Copy text copies the text.
- View raw transcript, if AI cleanup changed the wording.
- Reveal in Finder and Re-transcribe. They work when a recording is stored. Without one they are grayed out, and pointing at them explains how to turn on Audio Retention.
- Delete the item. This also deletes its recording.
The Transcripts tab is handy when a paste does not land where you expected: the text is still there to copy.
Data Retention
Where: WhisprDesk > Settings > Privacy & Data > Data Retention
- Open the WhisprDesk app: click its icon in the Dock (or open it from your Applications folder).
- Click the gear button at the top right of the window to open Settings.
- Click Privacy & Data.
- Turn Data Retention on or off. It is on by default.
- On: dictations are saved to Your Transcripts.
- Off: dictations are pasted but not saved, and no recordings are kept. The Transcripts tab tells you that saving is off.
Data Retention does not cover Notes. Notes you write, recordings made inside a note, and transcripts of audio files from the Transcribe a file tab are always saved in Notes, where you can delete them yourself. See Notes.
Audio Retention
Where: WhisprDesk > Settings > Privacy & Data > Audio Retention
- Open the WhisprDesk app: click its icon in the Dock (or open it from your Applications folder).
- Click the gear button at the top right of the window to open Settings.
- Click Privacy & Data.
- Under Audio Retention, choose Disabled (the default) or 7, 14, 30, 60, or 90 days.
- While Audio Retention is on, Storage Usage shows how many recordings are stored, with Show in Finder to open the folder and Clear All Audio to delete them.
- Disabled: no recordings are saved.
- A window you choose: each dictation's recording is kept for that many days, then deleted automatically. Cleanup runs when the app starts, when you change the setting, and every few hours.
- Recordings are kept only on your Mac. Use Show in Finder to see them.
- Recordings are only kept alongside a saved transcript. If Data Retention is off, no recordings are kept even when Audio Retention is set.
- Clear All Audio deletes every stored recording after you confirm.
If you shorten the window or choose Disabled while recordings exist, WhisprDesk asks before deleting the recordings that fall outside the new window. This cannot be undone.
There is no audio player in the app. To listen to a recording, open it from Finder.
Re-transcribe
Where: WhisprDesk > Transcripts tab (hover over a dictation)
Re-transcribe runs a stored recording through a local model again. It is useful for comparing a cloud result with a local one, or for recovering a dictation that failed.
First make sure a local model is downloaded: click the Models tab, click Speech to text, then click On this Mac (see Choosing a transcription engine). Then:
- Open the WhisprDesk app: click its icon in the Dock (or open it from your Applications folder).
- Click the Transcripts tab at the top of the window.
- Hover over a dictation that has a stored recording.
- Click Re-transcribe (the circular arrow).
- The new version appears right above the original.
- On a successful item, the new transcript is added as a new entry next to the original, so you can compare them. Both entries share the same recording, and deleting one does not affect the other.
- On a failed item, the item itself is updated with the new text.
- It needs a downloaded local model (Whisper or Parakeet). It never uses a cloud provider. If no local model is downloaded, the app tells you to download one.
- It uses your transcription language and Vocabulary words, and applies AI cleanup if cleanup is on.
- It is not available when Data Retention is off, because the new entry could not be saved.
- It needs a stored recording, so Audio Retention must have been on when you dictated. Without one, the button is grayed out.
Deleting your data
Where: WhisprDesk > Transcripts tab, or WhisprDesk > Settings
Start by opening the WhisprDesk app (click its icon in the Dock), then:
| To delete | Do this |
|---|---|
| One dictation | Click the Transcripts tab, hover over the dictation, and click Delete |
| All transcripts | Click the Transcripts tab, then click Clear all |
| All recordings | Click the gear button at the top right, then Privacy & Data, then Clear All Audio |
| Everything WhisprDesk stores on this Mac | Click the gear button at the top right, then System, then Reset app data. This also deletes your saved API keys. Your license stays activated. |