Notes
Applies to WhisprDesk 1.9.0 · Updated 2026-11-16
Notes is a simple notes app inside WhisprDesk. You can write notes, transcribe audio files into notes, record into a note, and run AI Actions such as Generate Notes. Notes are stored on your Mac and are not affected by the Data Retention setting.
Before you start
Open the WhisprDesk app: click its icon in the Dock, or open it from your Applications folder. The WhisprDesk window opens on the Transcripts tab. If WhisprDesk is running but you don't see its window, click the WhisprDesk icon in the menu bar at the top right of your screen and choose Open WhisprDesk. Across the top are the Transcripts, Notes, Transcribe a file, Vocabulary, and Models tabs, and the gear button at the top right opens Settings.
Folders
Where: WhisprDesk > Notes tab
Click the Notes tab to see your folders and notes. Notes start with a Personal folder, where transcripts of audio files are saved. You can create, rename, and delete folders, and move a note with Move to folder.
Writing notes
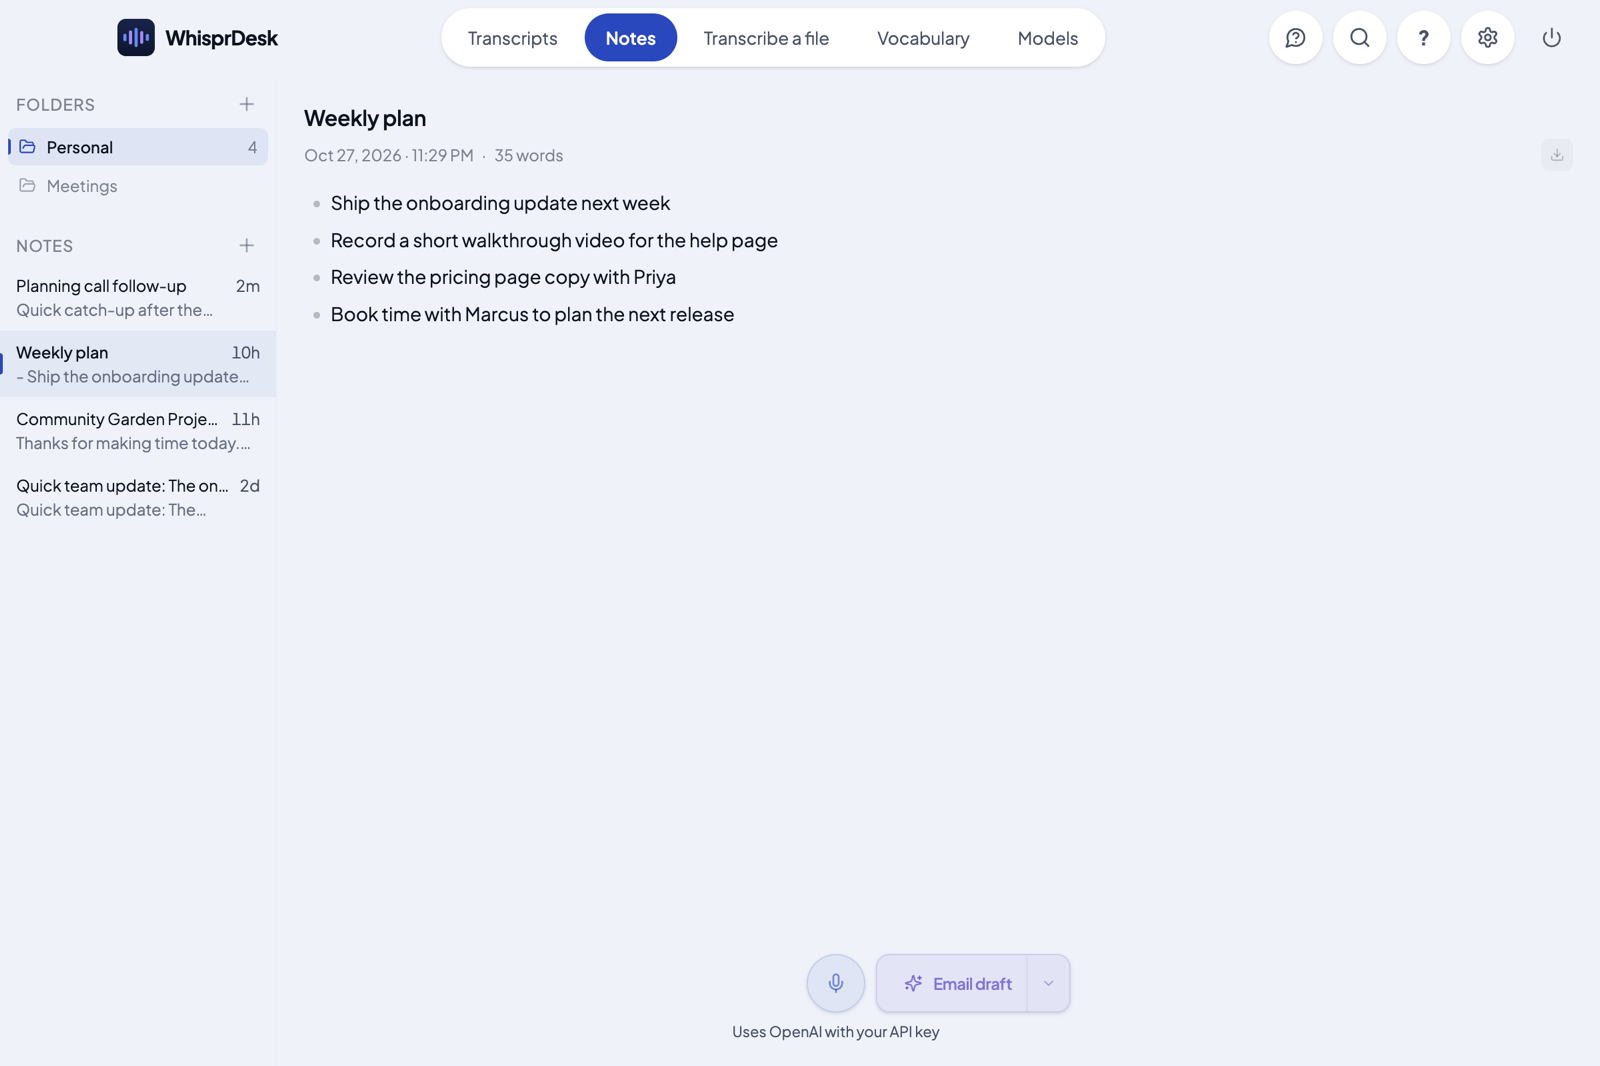
Where: WhisprDesk > Notes tab
- Open the WhisprDesk app: click its icon in the Dock (or open it from your Applications folder).
- Click the Notes tab at the top of the window.
- Click New note (the plus button).
- Type a title and start writing.
Notes show a word count and save automatically as you type.
Transcribe an audio file
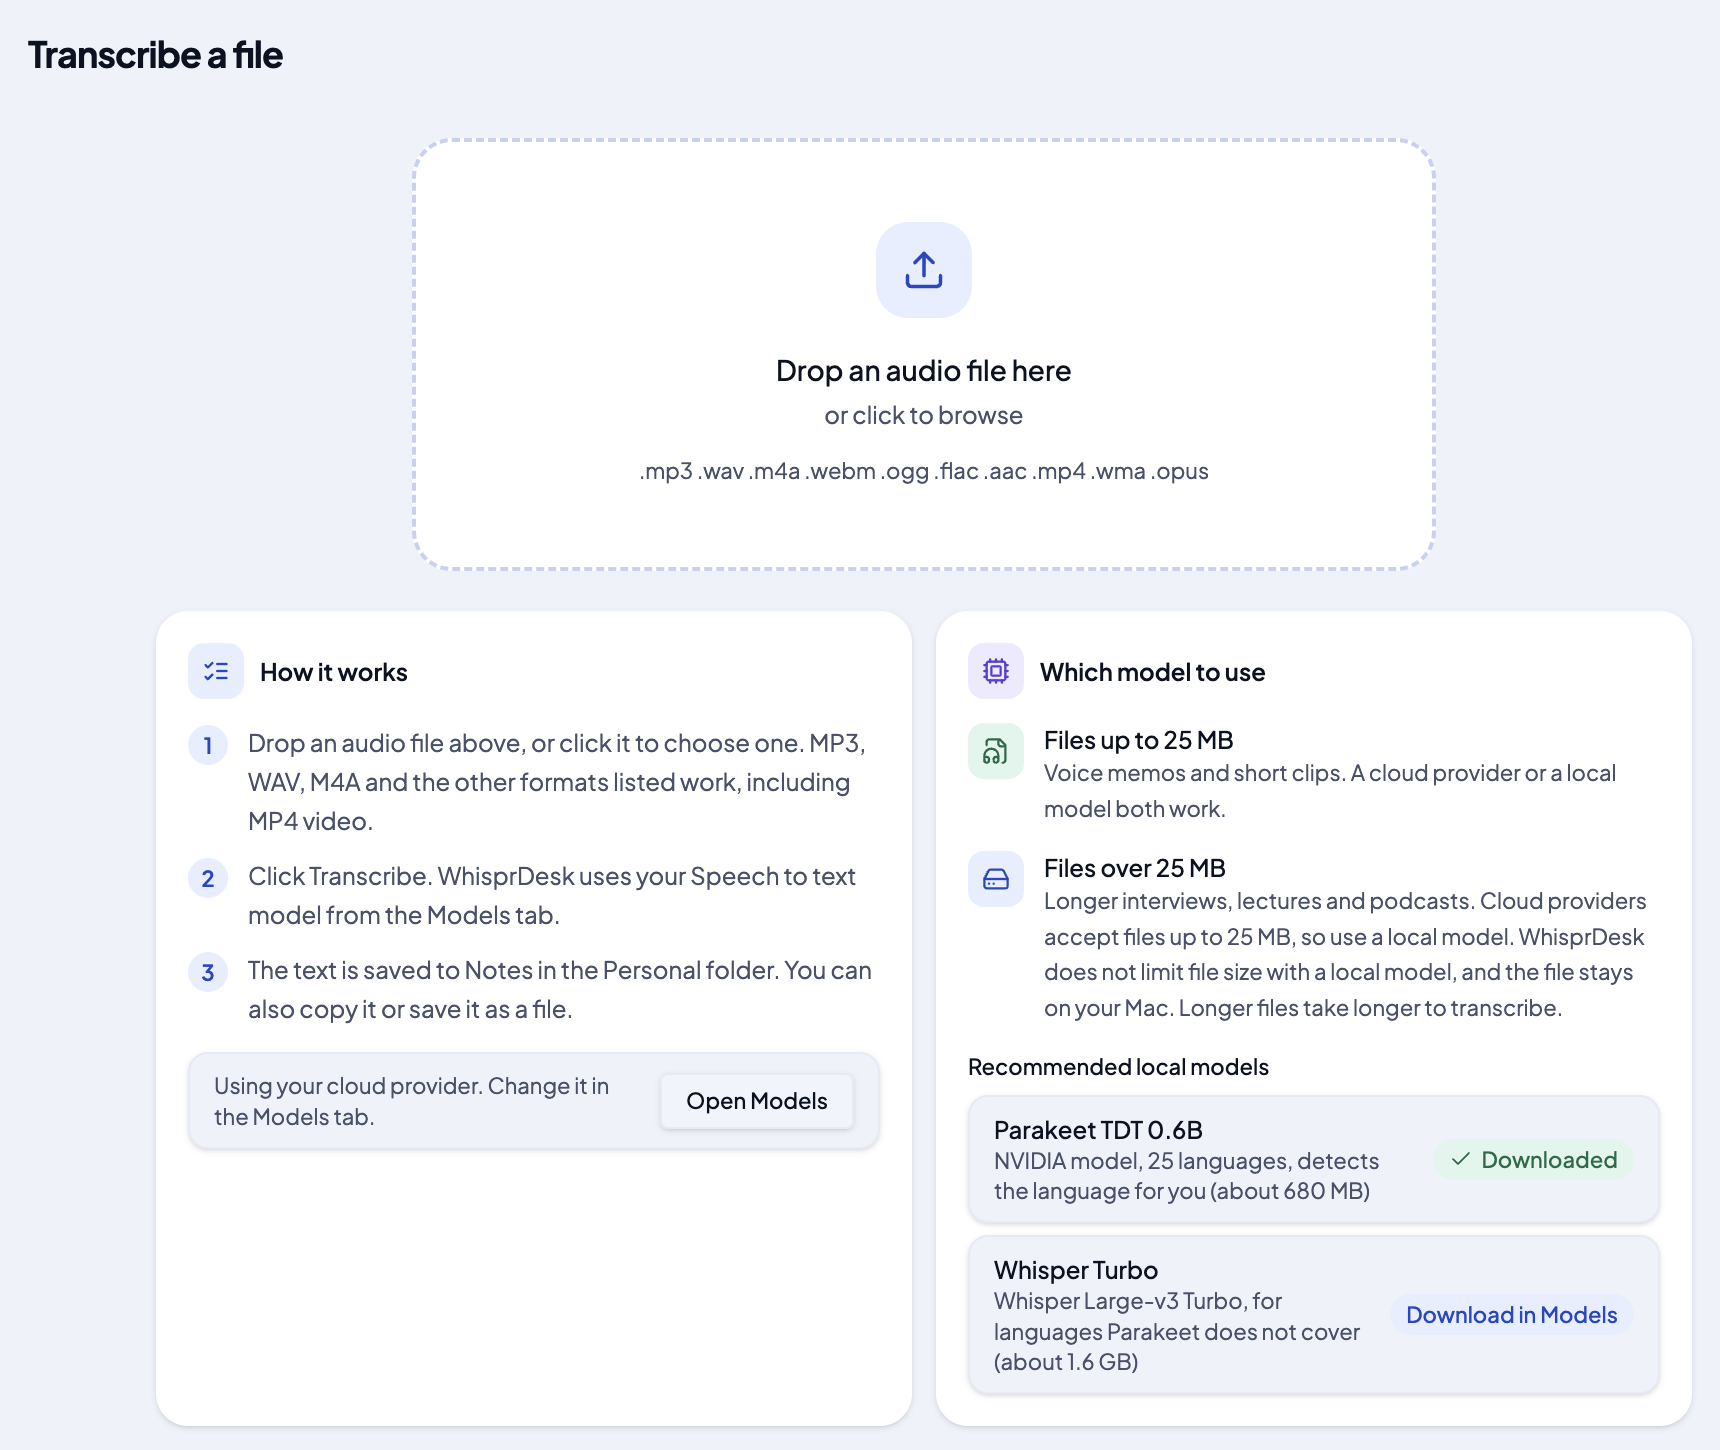
Where: WhisprDesk > Transcribe a file tab
Use this to transcribe your own recordings, such as MP3 or WAV files from a voice recorder or your phone.
- Open the WhisprDesk app: click its icon in the Dock (or open it from your Applications folder).
- Click the Transcribe a file tab at the top of the window.
- Drop an audio file onto the window, or click the drop area to browse for a file (MP3, WAV, and the other formats below).
- Click Transcribe. WhisprDesk uses the model you chose in Models > Speech to text; the screen shows which one it is using.
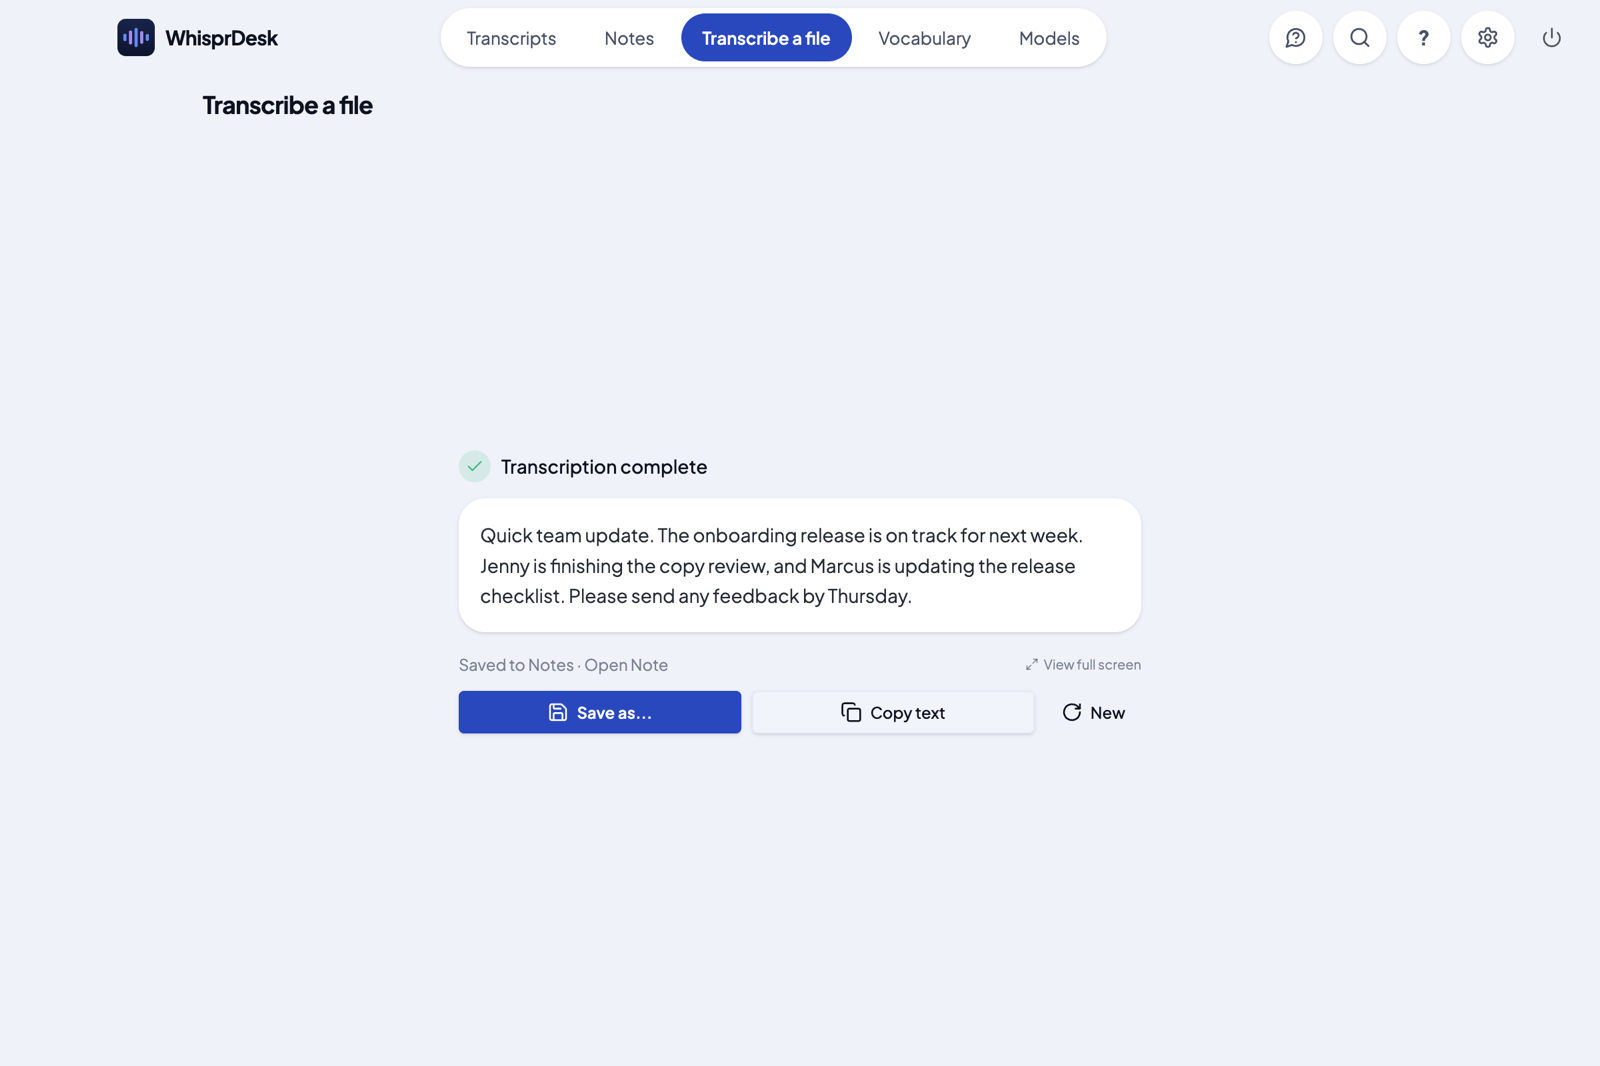
- When it finishes you will see Transcription complete with the text, and Saved to Notes. Click Open Note to go straight to it. It is saved in the Personal folder.
- Click Copy Text to copy it, or Save As... to save it as a file.
- To transcribe another file, click New.
If no engine is set up yet, the screen shows No transcription provider set up and offers Open Models.
Supported formats: MP3, WAV, M4A, WebM, OGG, FLAC, AAC, MP4, WMA, and Opus.
Where the audio goes:
- Local mode: transcribed on your Mac with your downloaded Whisper or Parakeet model. The file does not leave your Mac.
- Cloud mode: the file is sent directly to your chosen provider. Cloud files are limited to 25 MB each.
Small and large files
The page shows which model to use for your file:
- Files up to 25 MB, such as voice memos and short clips: a cloud provider or a local model both work.
- Files over 25 MB, such as longer interviews, lectures and podcasts: cloud providers do not accept them, so use a local model. WhisprDesk does not limit file size with a local model. Longer files take longer to transcribe.
Recommended local models, both downloaded from Models > Speech to text:
- Parakeet TDT 0.6B: 25 languages, detects the language for you (about 680 MB).
- Whisper Turbo: for languages Parakeet does not cover (about 1.6 GB).
Each one shows Downloaded, or a Download in Models link that opens the Models tab.
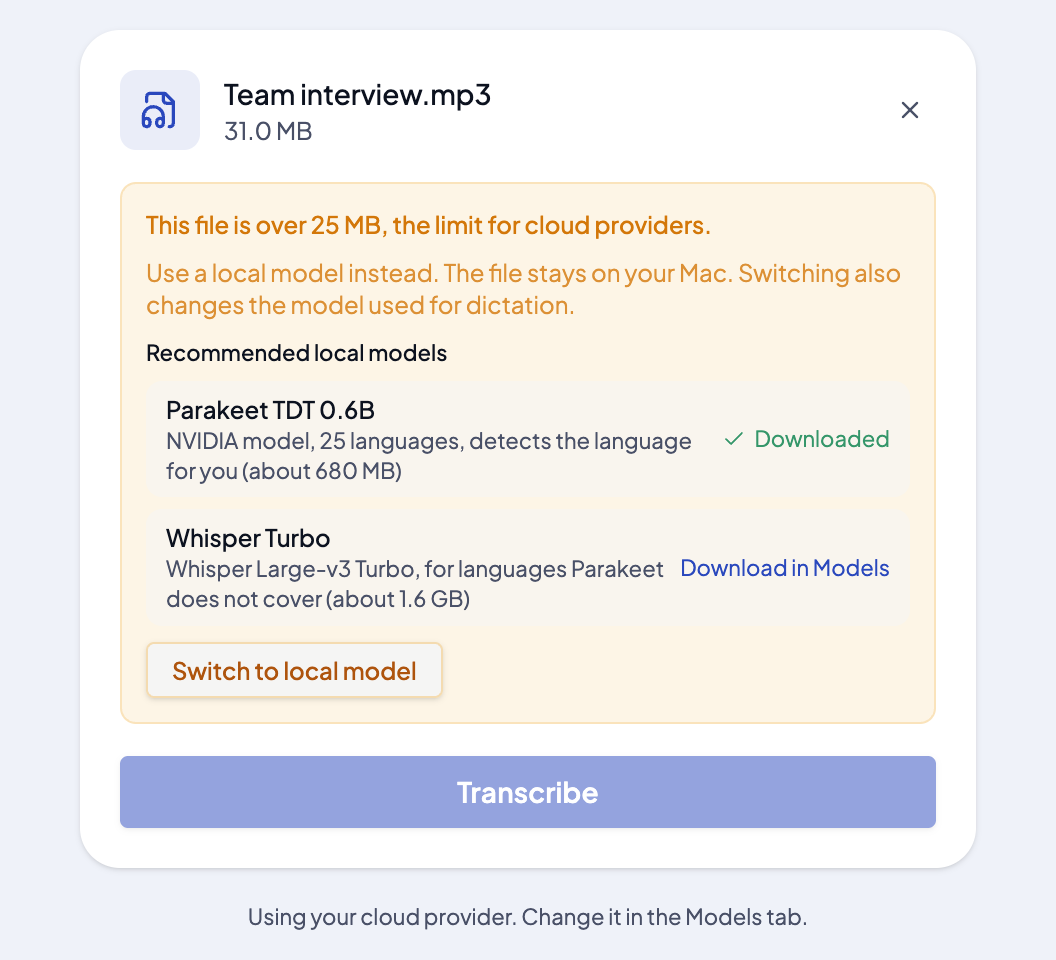
If you are using a cloud provider and choose a file over 25 MB, WhisprDesk tells you the file is over the limit and shows the recommended models. If your local model is already downloaded, click Switch to local model. This also changes the model used for dictation; you can switch back in Models > Speech to text. If you have no local model yet, click Open Models to download one, then come back to the file.
From the result screen you can also Copy the text or Save As a Markdown (.md) file in a folder you choose. If AI cleanup is on, the note gets an AI-generated title. Otherwise the first few words become the title.
Record into a note
Where: WhisprDesk > Notes tab > open a note > microphone button
- Open the WhisprDesk app: click its icon in the Dock (or open it from your Applications folder).
- Click the Notes tab and open a note.
- Click the microphone button (labelled Transcribe) and start speaking. The line under the button, Uses OpenAI with your API key, is a reminder that this recording goes to OpenAI.
- Click Stop when you are done.
This is a cloud feature. It always uses OpenAI's realtime service, even when WhisprDesk is set to a local model. It needs:
- Your OpenAI API key.
- The macOS Screen Recording permission, shown in WhisprDesk as System Audio. This lets it capture other apps' audio together with your microphone. Your screen is not recorded.
Your microphone and your Mac's other audio are sent to OpenAI using your key. If WhisprDesk cannot capture system audio, recording stops and tells you how to allow it.
For on-device transcription, use regular dictation or the Transcribe a file tab with a local model instead.
AI Actions
Where: WhisprDesk > Notes tab > open a note > actions menu
AI Actions run on a note using your AI cleanup model.
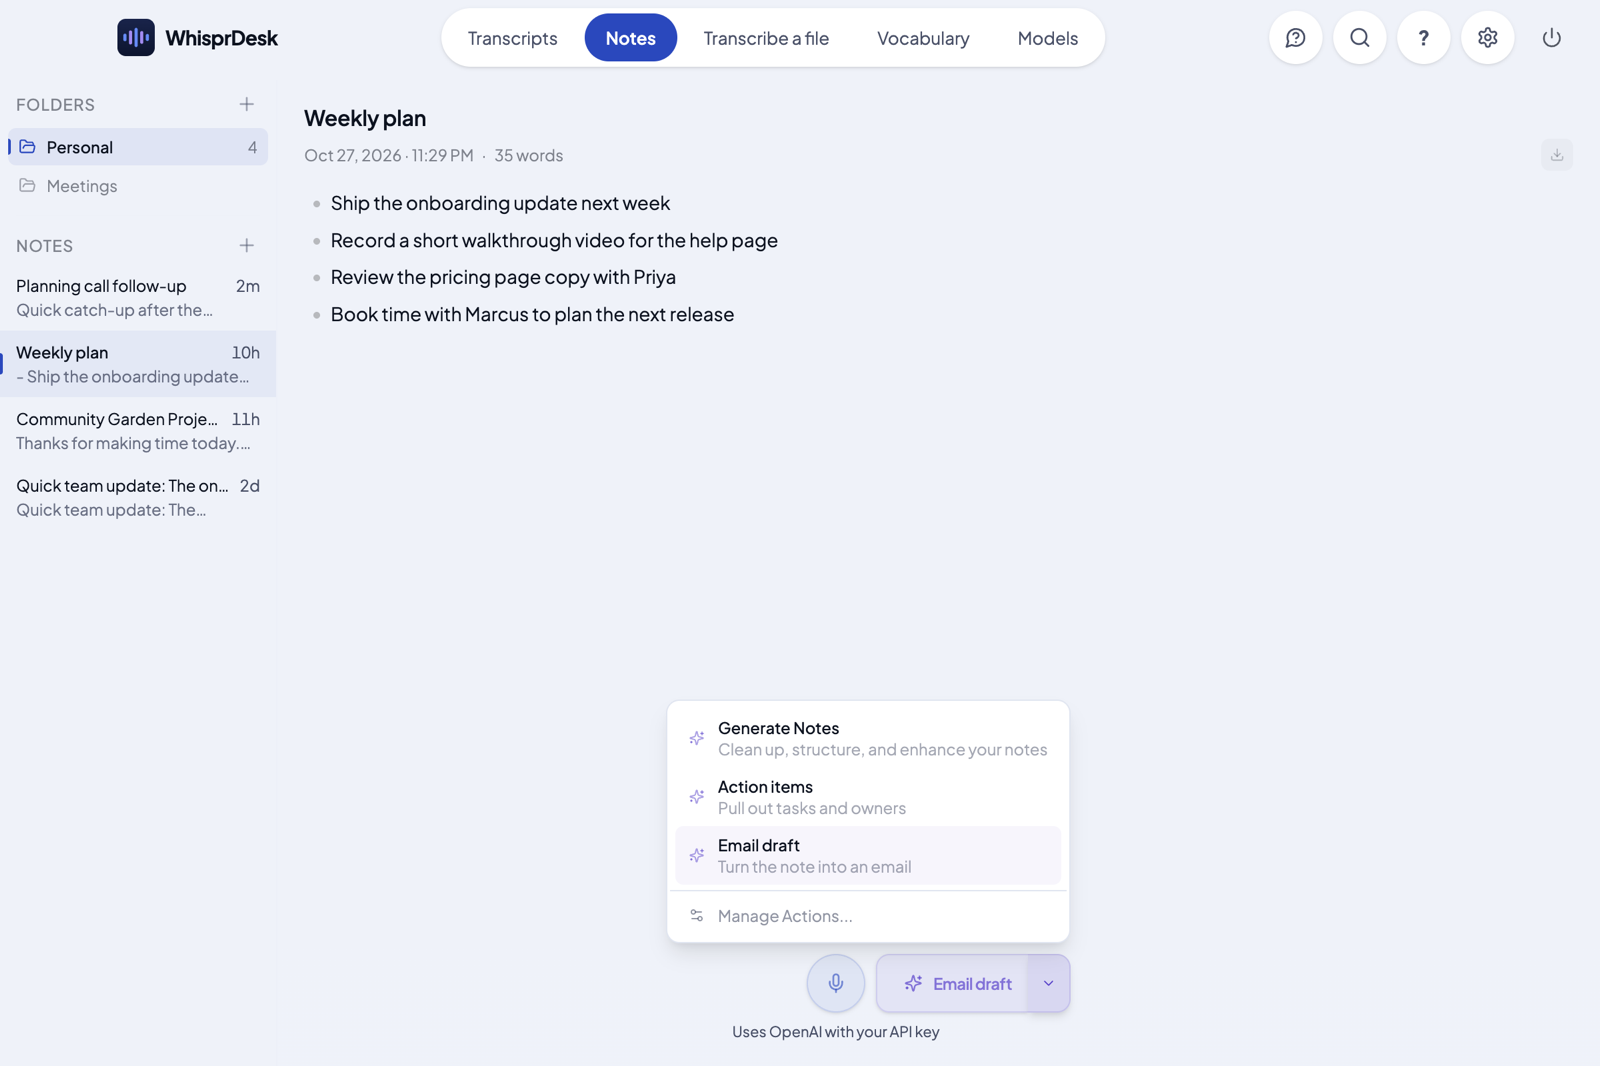
- Generate Notes cleans up, structures, and enhances a note.
- You can add your own actions. See Create your own action below.
- A note can show its Notes (your text) and Enhanced (the AI result) versions.
Recording and AI Actions are separate steps on purpose. When you stop recording, the plain transcript goes into the note and nothing is sent to the AI yet. You can read it, record more, then pick the action you want, or skip AI entirely.
Create your own action
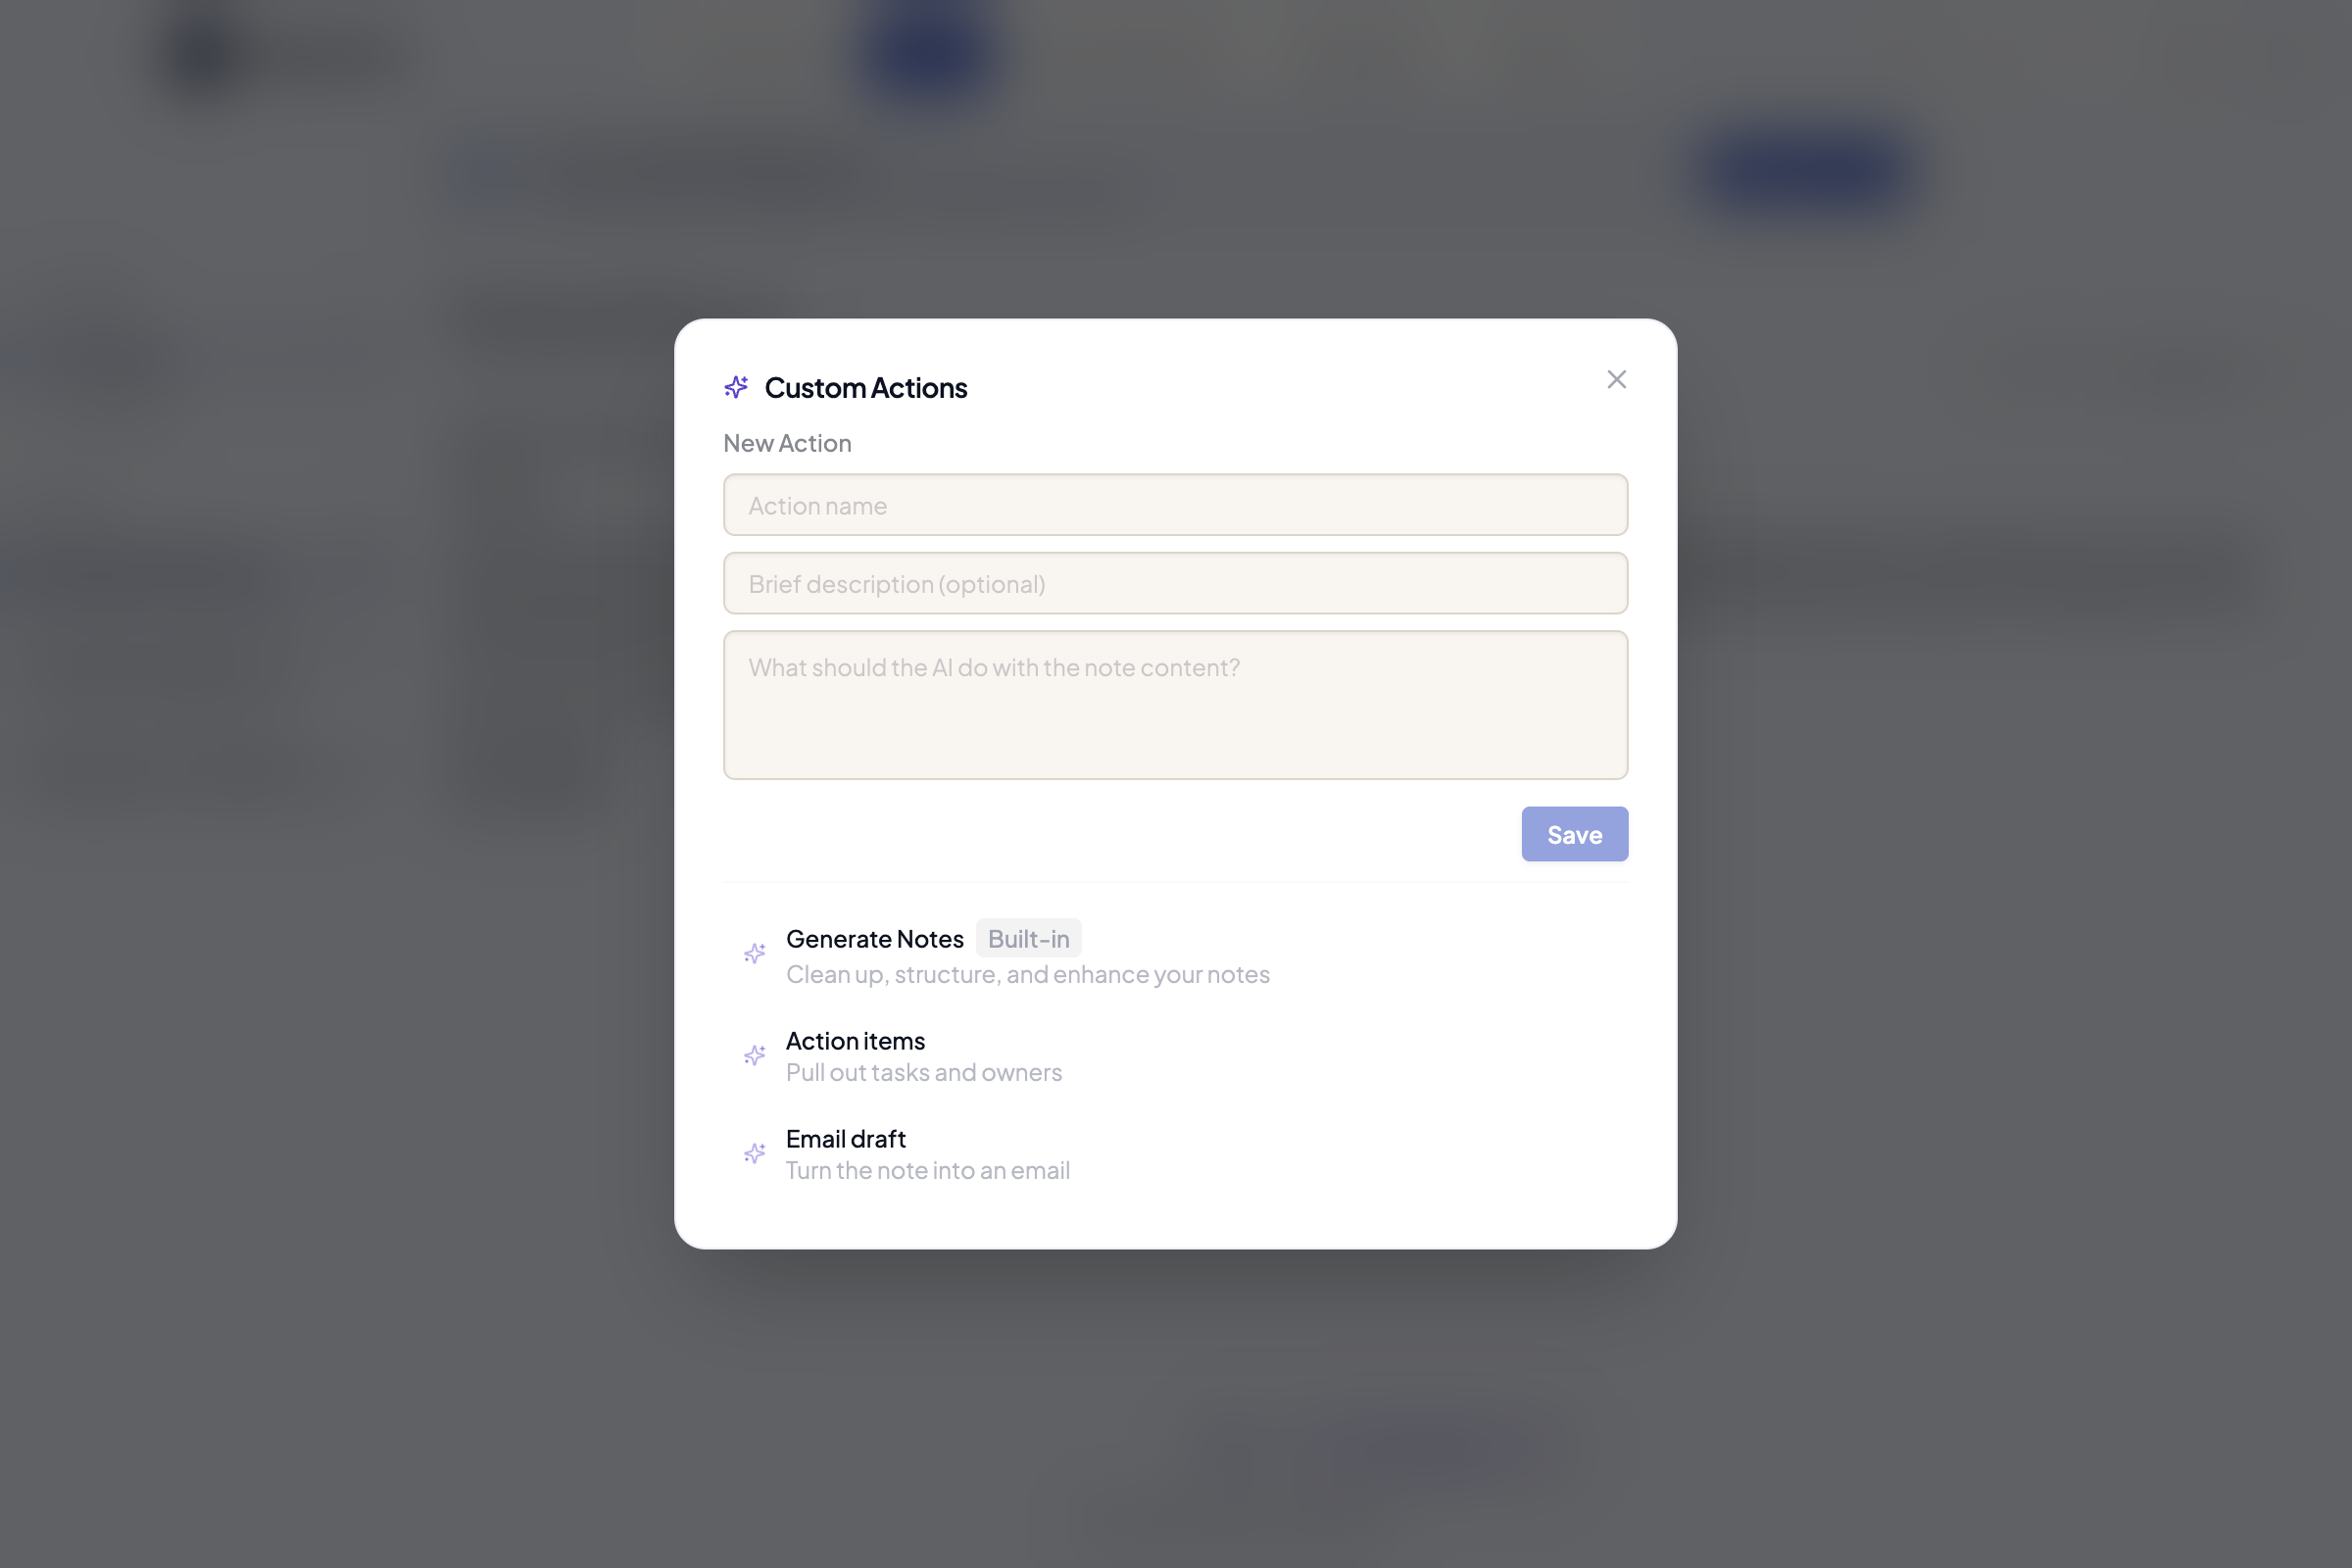
Where: WhisprDesk > Notes tab > open a note > arrow next to the action button > Manage Actions...
- Open the WhisprDesk app: click its icon in the Dock (or open it from your Applications folder).
- Click the Notes tab and open a note.
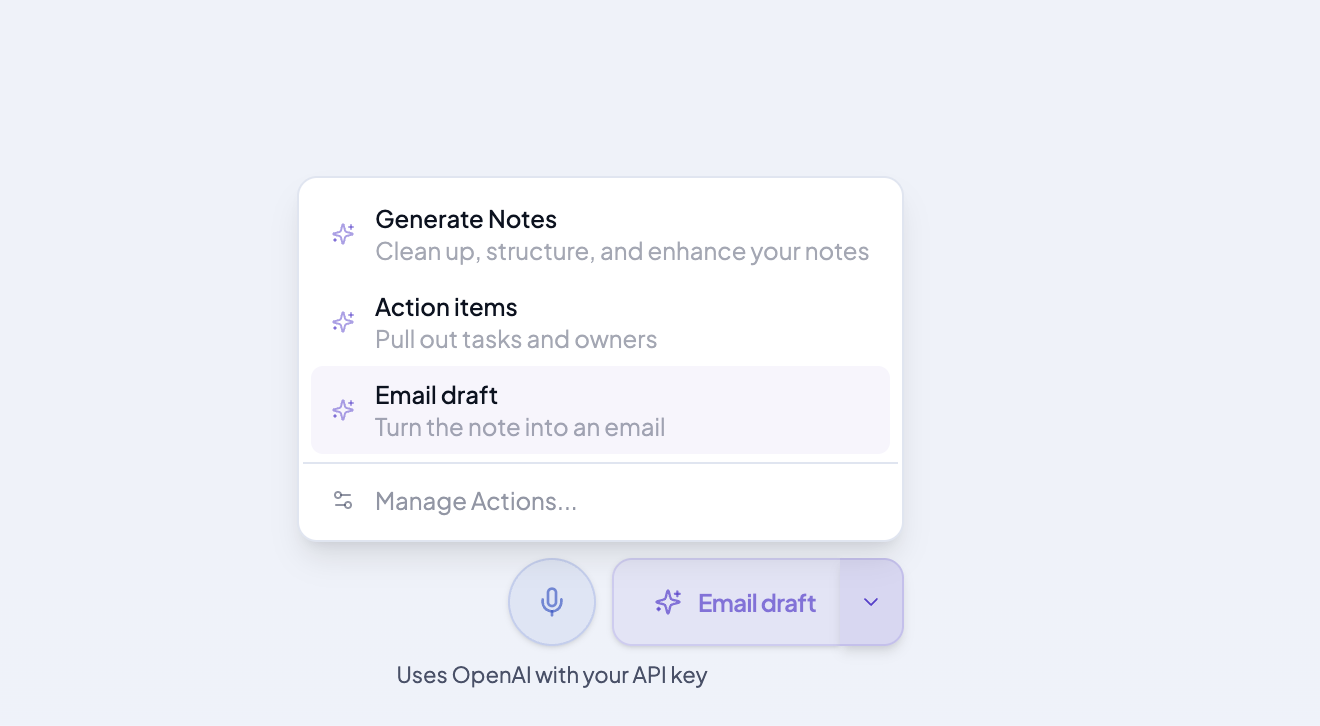
- Click the small arrow next to the action button (it shows Generate Notes until you pick another action).
- Choose Manage Actions.... The Custom Actions window opens with a New Action form at the top and your actions listed below it.
- Fill in the three fields:
- Action name: what the button shows.
- Brief description (optional): the line shown under the name in the menu.
- What should the AI do with the note content?: your instructions to the AI.
- Click Save. Your action now appears in the list and in the same menu, under Generate Notes.
To run it, open the arrow menu and click your action. The button then shows that action, so you can run it again with one click.
Two actions to start with
Copy these into the New Action form as they are, or change them to suit you. The examples below were run on this note:
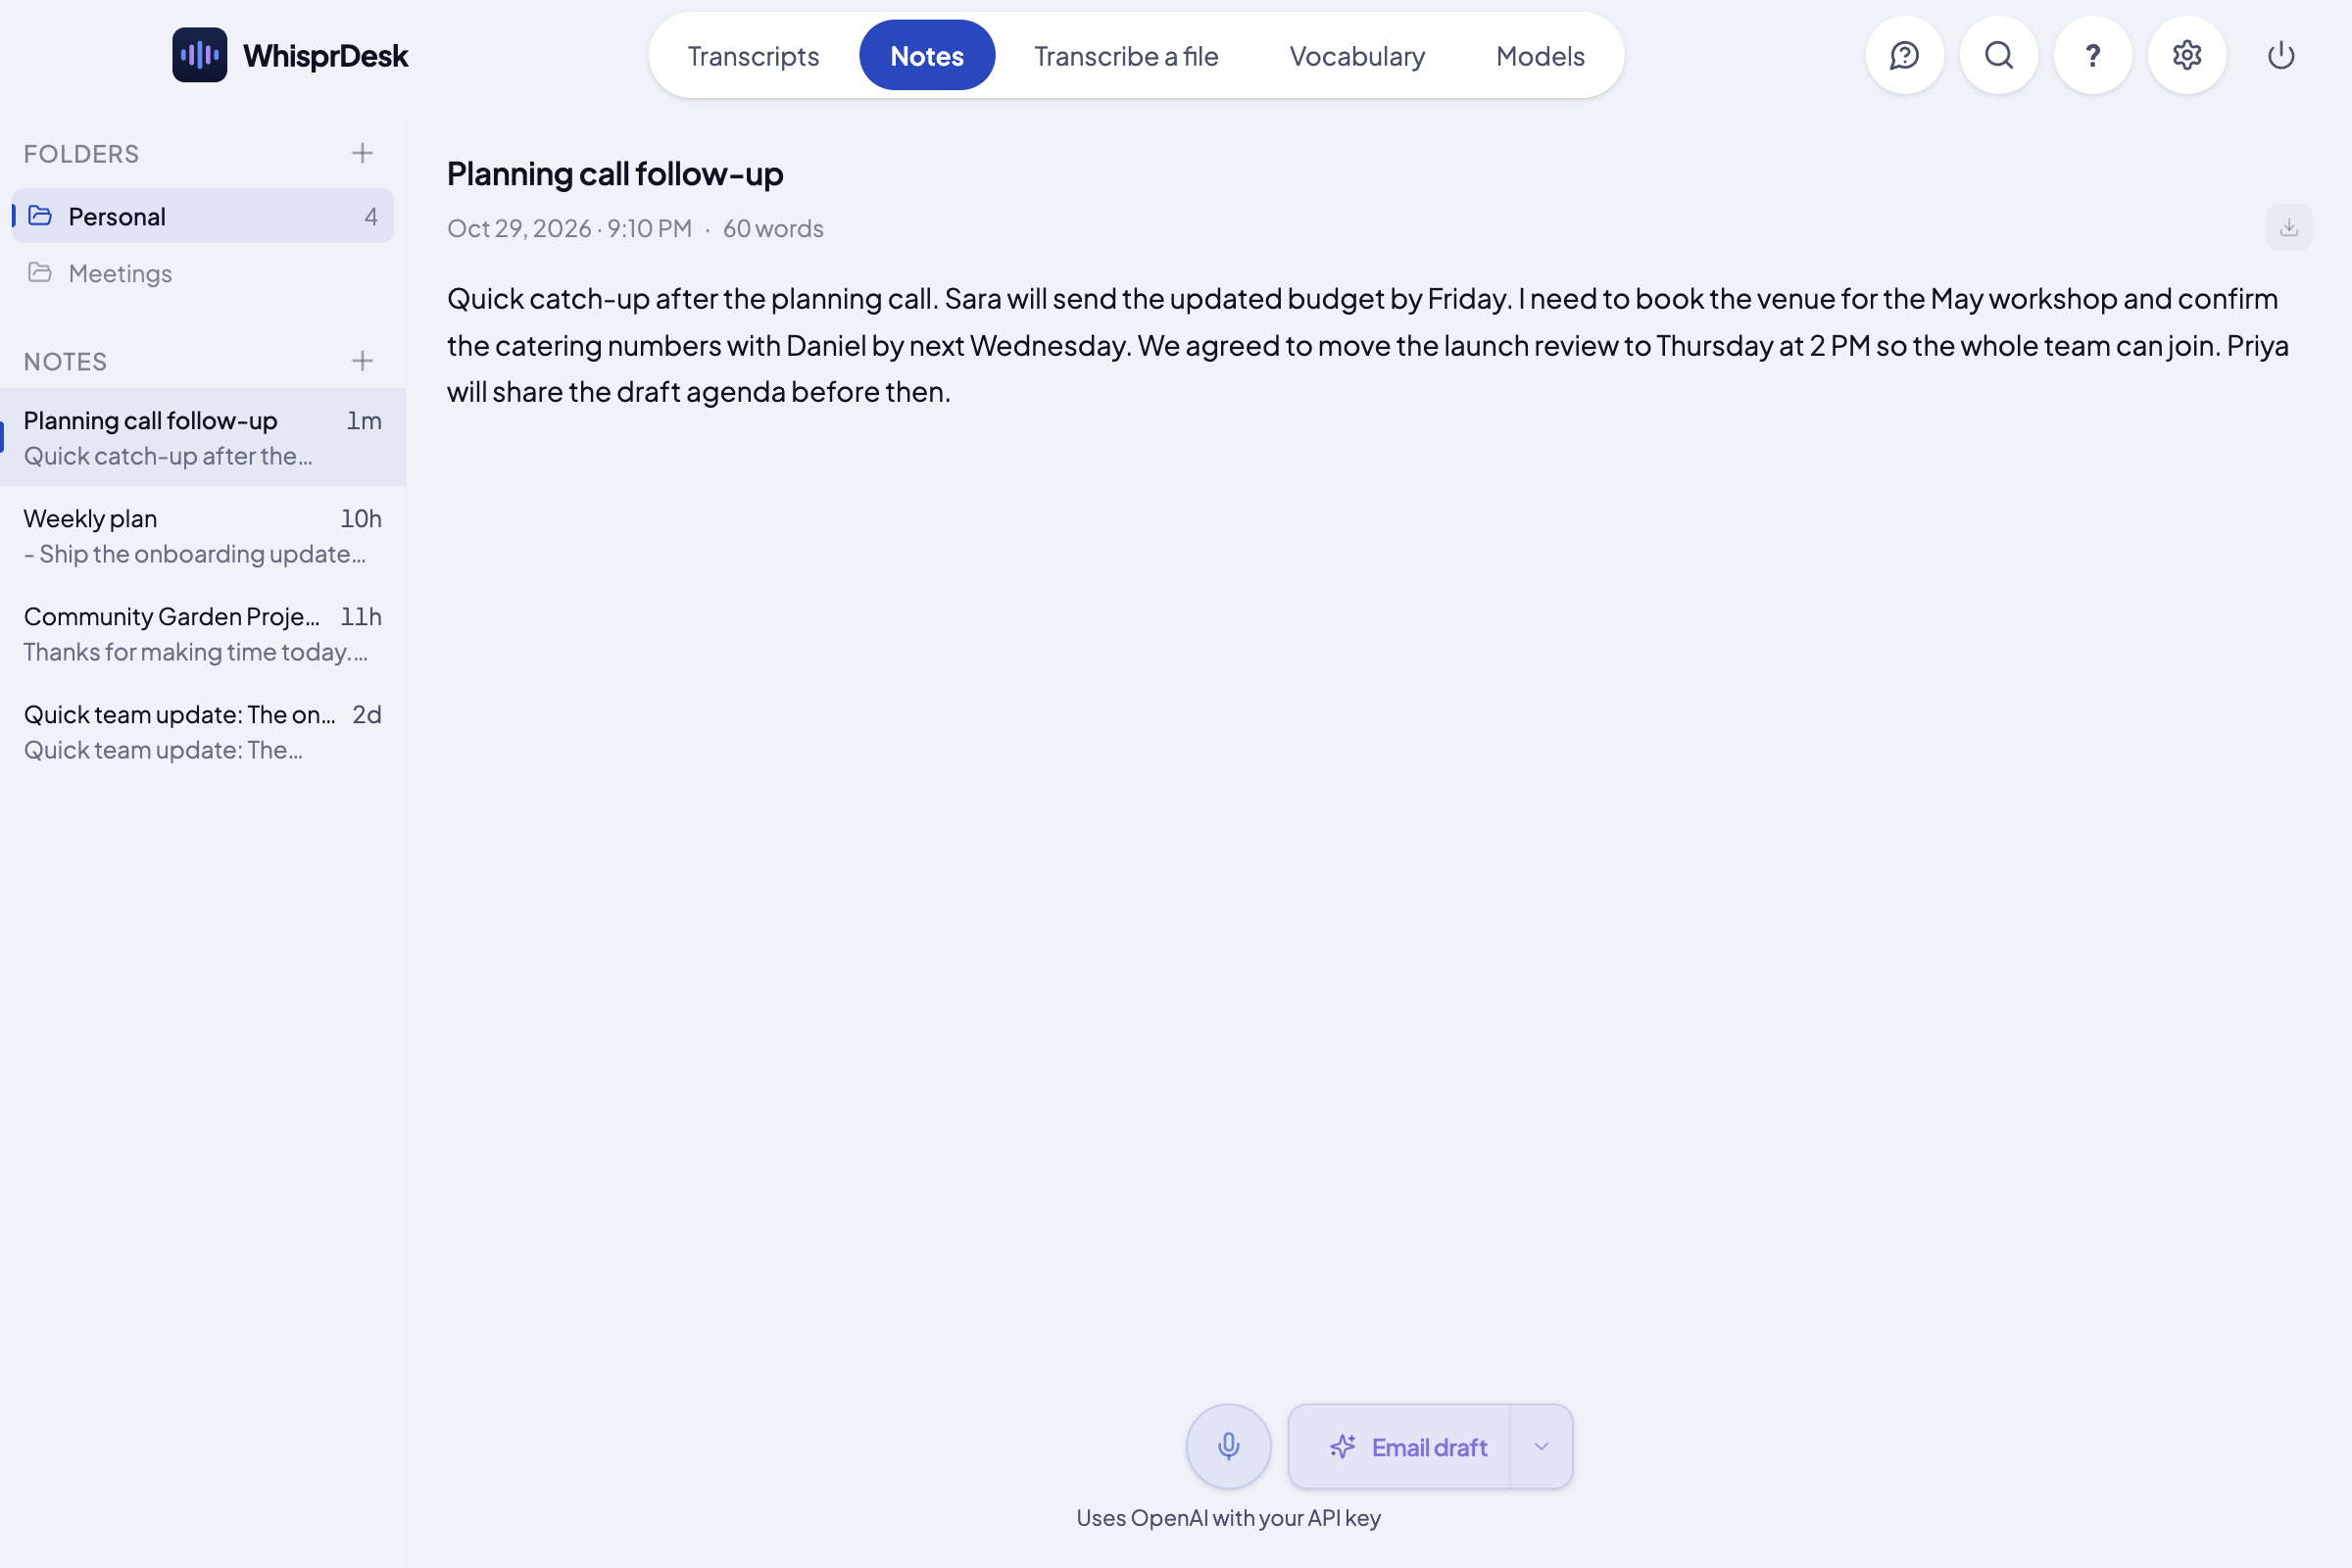
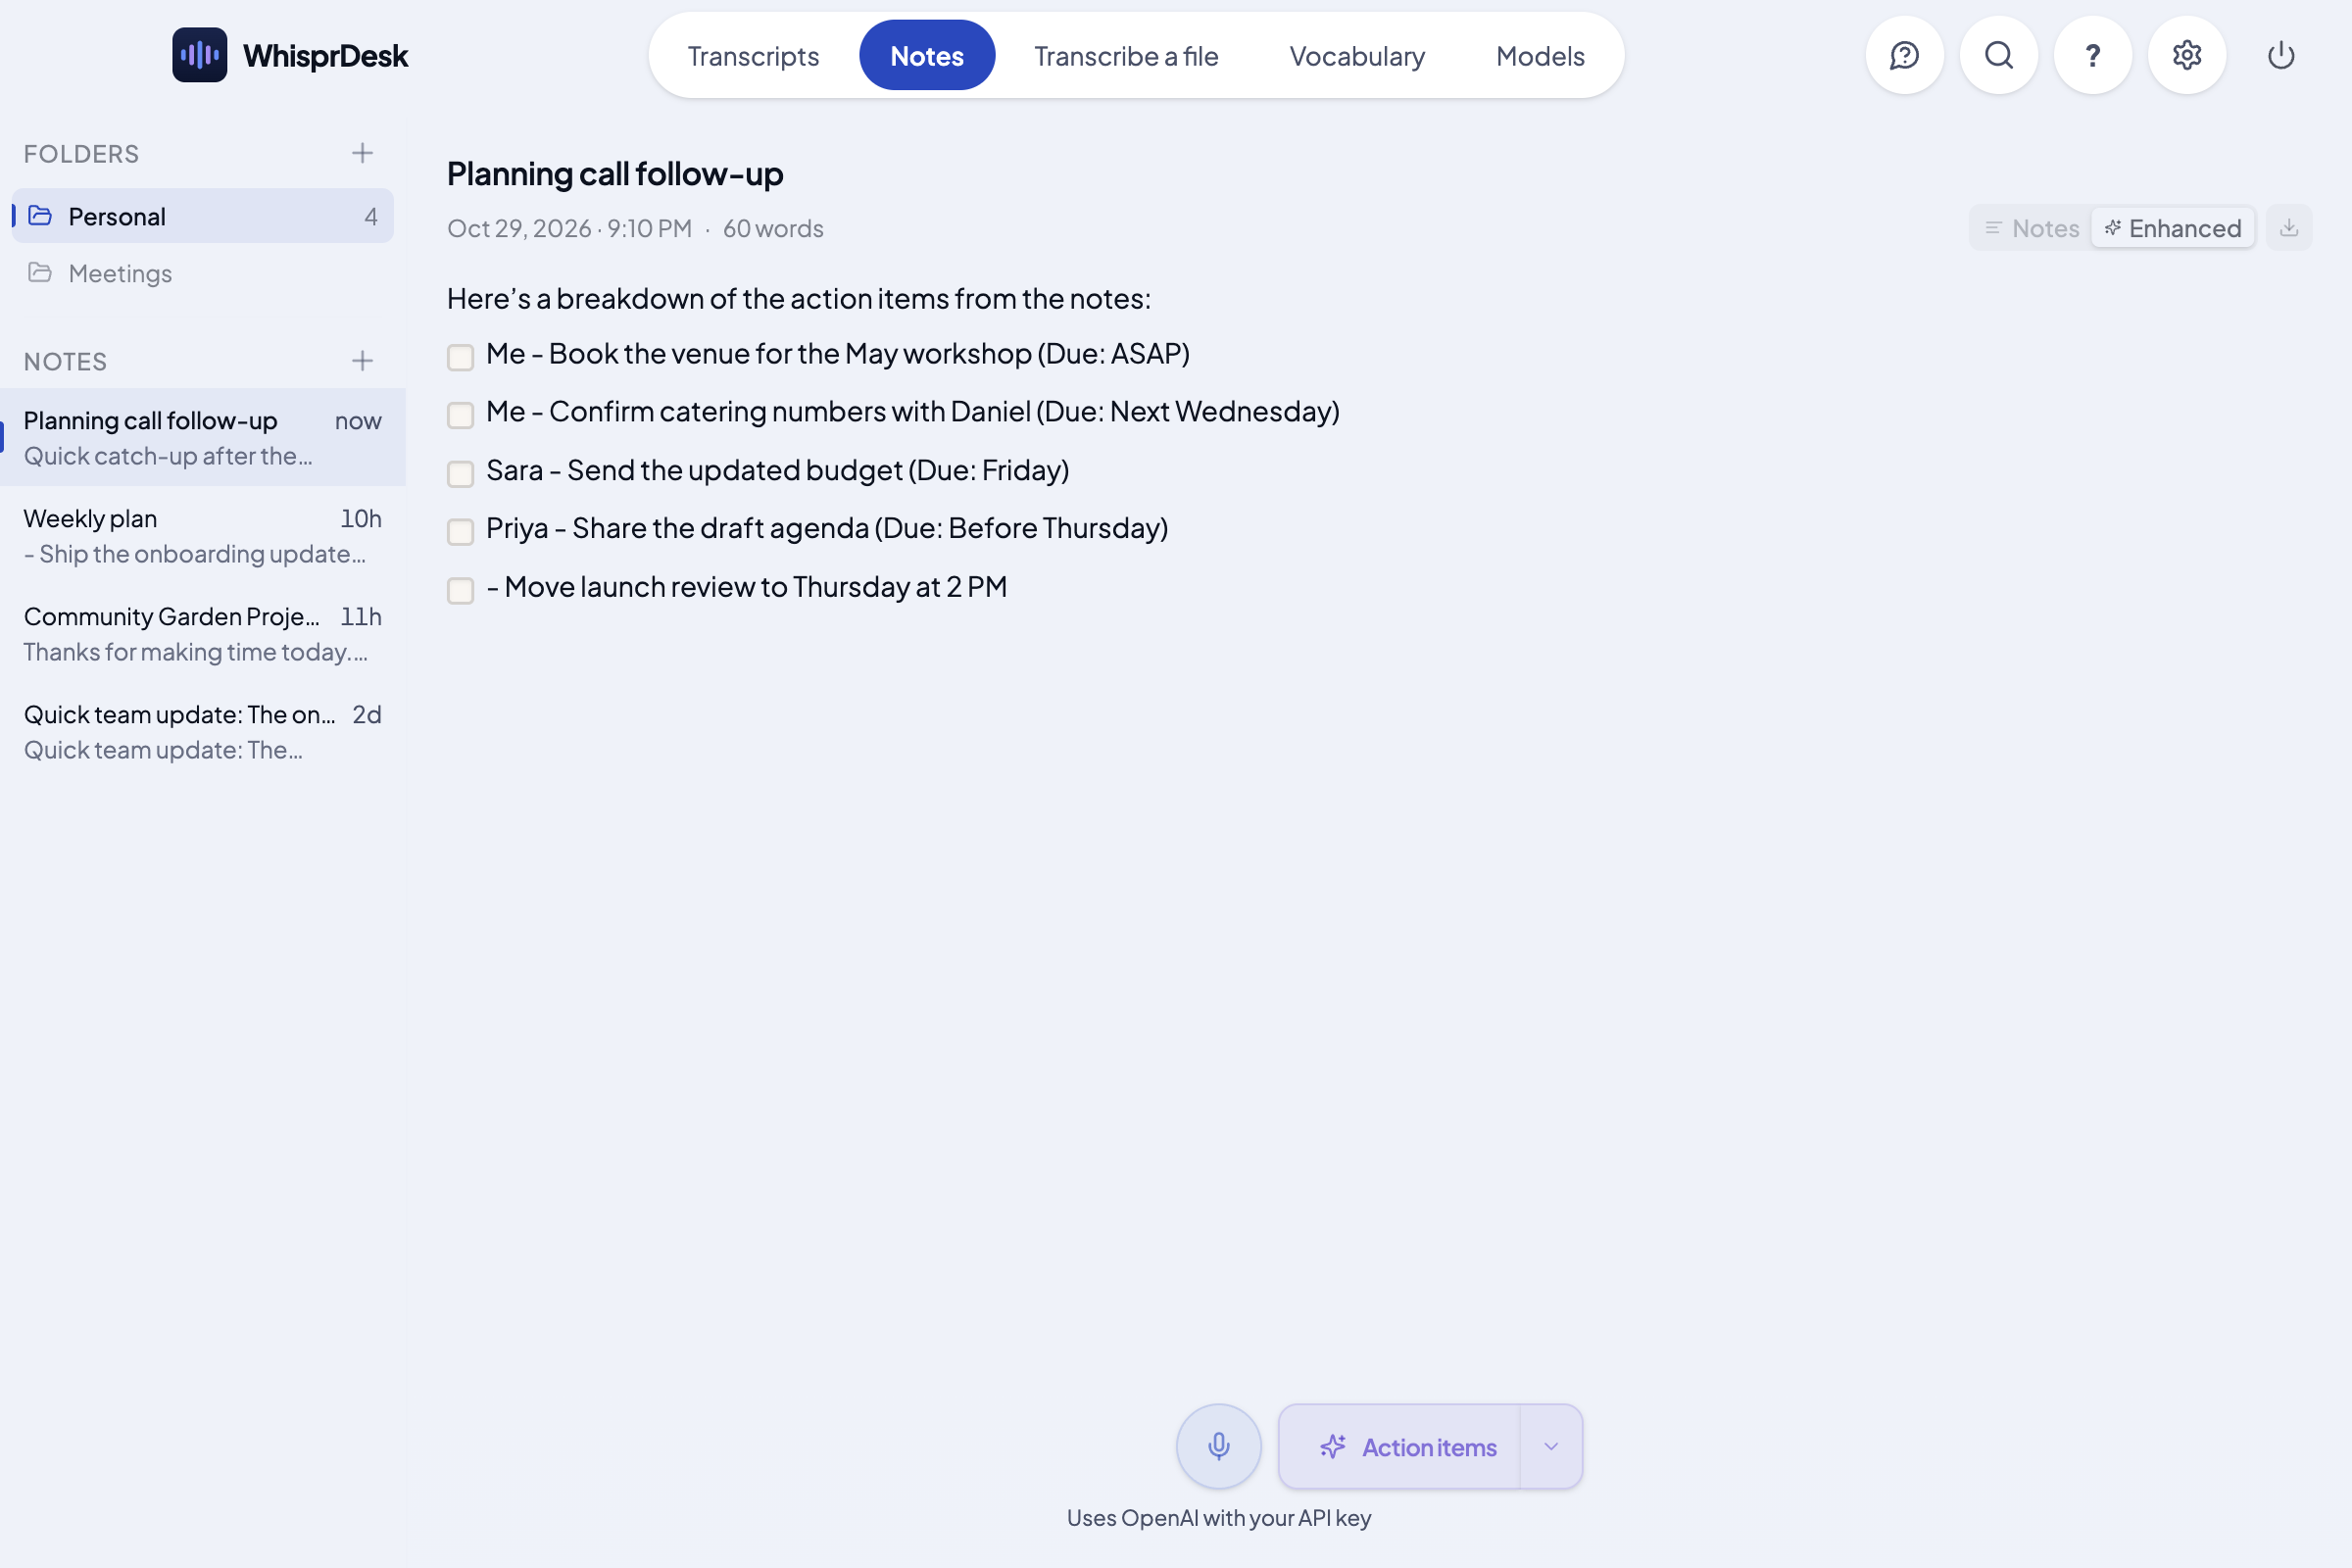
Action items
- Action name: Action items
- Brief description: Pull out tasks and owners
- What should the AI do with the note content?
From the note, list every task or follow-up as a checkbox item. Start each with the person responsible if one is mentioned (write "Me" when the speaker means themselves), and add any due date mentioned. Do not add tasks that are not in the note. If there are none, reply "No action items found."
Result:
Email draft
- Action name: Email draft
- Brief description: Turn the note into an email
- What should the AI do with the note content?
Rewrite the note as a short, polite email. Add a subject line first, then a greeting, the key points in plain sentences, and a closing. Keep all facts, names and numbers exactly as in the note. Do not invent details.
Result:
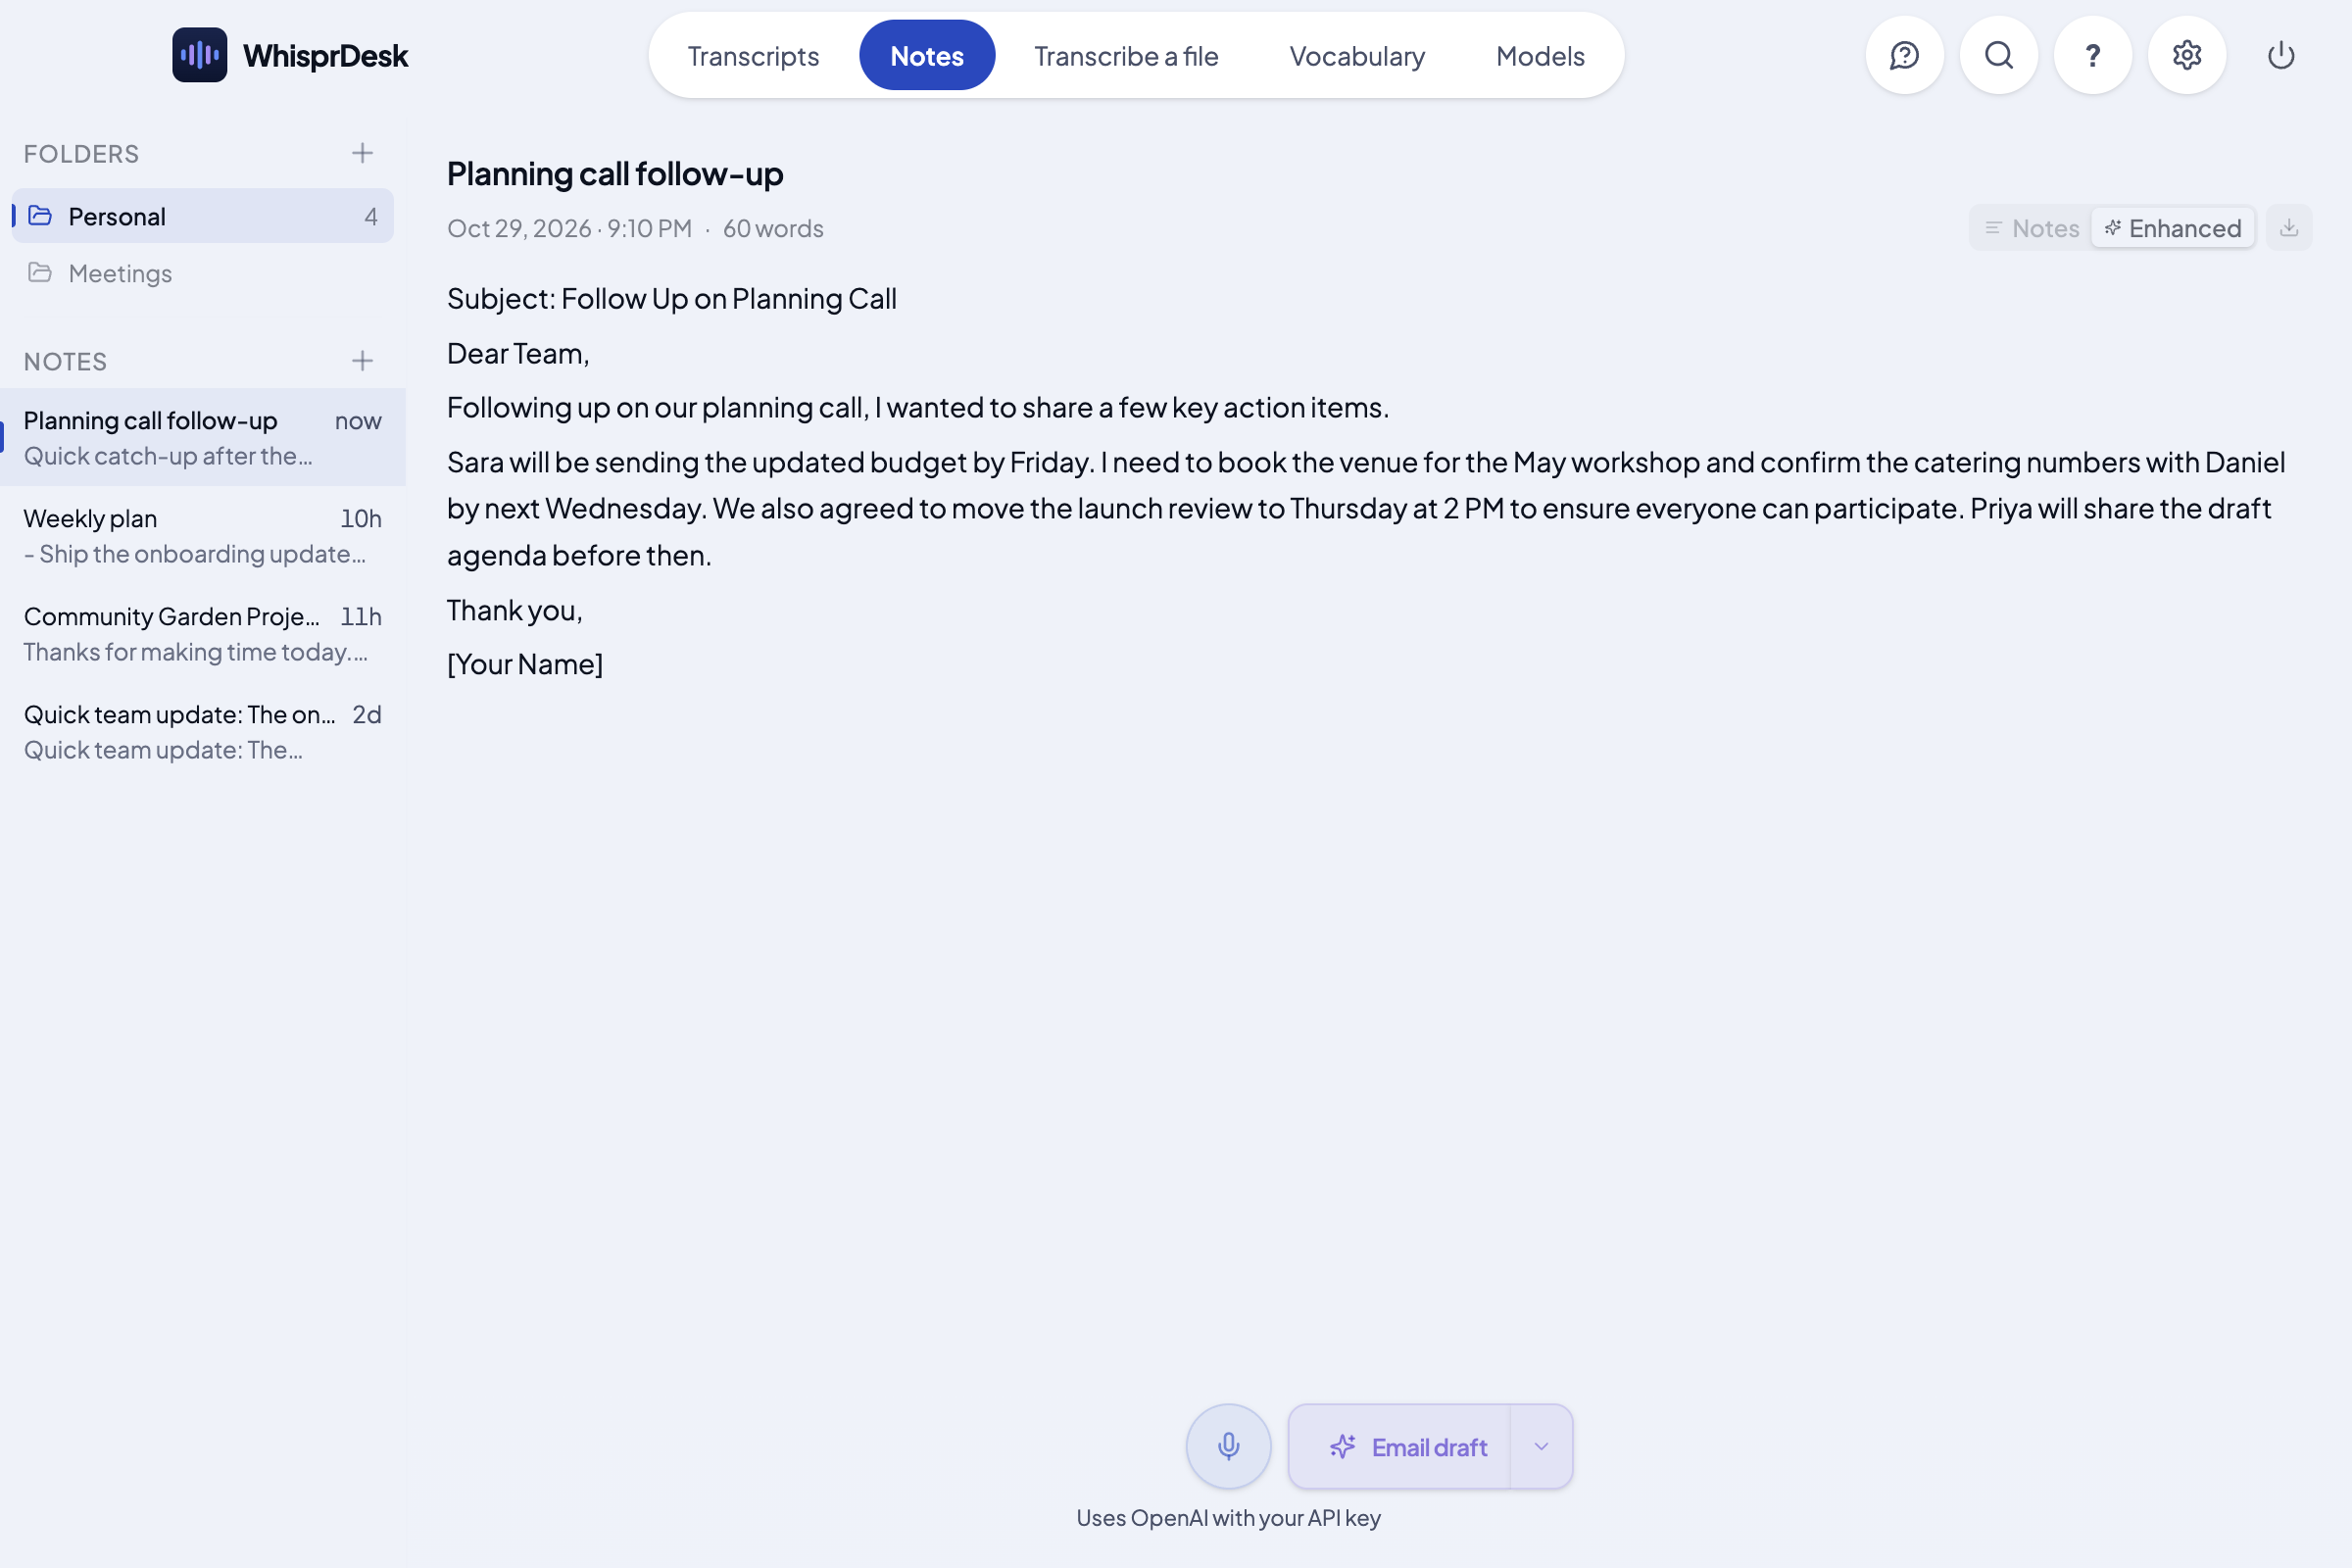
Your original text is kept. Use the Notes and Enhanced switch at the top right of the note to move between your text and the AI result.
To try them, record a few sentences that mention a task, a person and a date, for example: "Sara will send the updated budget by Friday, and I need to book the venue for the May workshop." Then run Action items or Email draft on the note.
Tips for writing your own:
- Say exactly what the result should look like (a list, checkboxes, an email, a short summary).
- Tell the AI to keep names, numbers and facts as they are, and not to add anything.
- AI output is a draft. Check it before you rely on it or send it.
You need a cleanup model selected in Models > AI cleanup (click the Models tab, then AI cleanup), which means turning on text cleanup. A cloud model receives the note text; a local model runs on your Mac. See AI cleanup.
Export
Where: WhisprDesk > Notes tab > open a note > Export
- Open the WhisprDesk app: click its icon in the Dock (or open it from your Applications folder).
- Click the Notes tab and open the note.
- Click Export.
- Choose As Markdown or As Plain Text.
Search
Where: anywhere in the WhisprDesk window
With the WhisprDesk window open, press Cmd+K, or click the search button at the top right, to search your note titles and contents, along with your 50 most recent transcripts. Note search works best with English letters and numbers; searching notes for other scripts or accented letters may not find matches yet.
Delete a note
Where: WhisprDesk > Notes tab > the note's ... menu
- Open the WhisprDesk app: click its icon in the Dock (or open it from your Applications folder).
- Click the Notes tab.
- Open the note's ... menu in the list.
- Choose Delete.
Current limits
- Recording into a note is cloud only. There is no on-device option for it yet.
- Export is Markdown or plain text only.
- Notes are stored on your Mac. There is no sync or sharing between devices.
- Notes are always saved, whatever the Data Retention setting. Delete them yourself when you no longer need them.